Early in my career at RIT I realized that an electric vehicle of some type would be very useful for getting around campus. I let this thought simmer and after a few non starters such as an electric scooter [I still might get to that project some day] I decided that an ebike was the way to go.
Unfortunately my bike is not well suited for an ebike conversion. It is a dual suspension mountain bike with no places to mount motor controllers or batteries.

One day towards the end of my freshman year one of my professors showed up to school with a very unique bike accessory. He had brought a motorized trailer that pushes his bike. The trailer in question is made by a company called Ridekick.
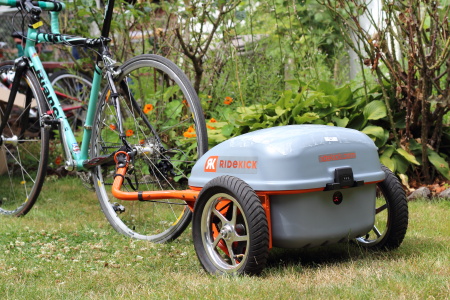
The concept of a trailer pushing a bike was a bit foreign to me until I had a chance to ride my professor’s bike around the block.
It turns out that the physics of the bike and trailer system closely mimic the normal forces exerted on the frame when riding a bike. When someone peddles a bike the force that ends up pushing the bike forward is transferred into the frame at the points that it attaches the the real wheel axle. When you attach a trailer to that axle it pushes the bike from virtually the same place as peddling the bike would. This results in a surprisingly stable system.

Of course if there is one common theme throughout my projects it is that neat gadgets are expensive and often easy to replicate.
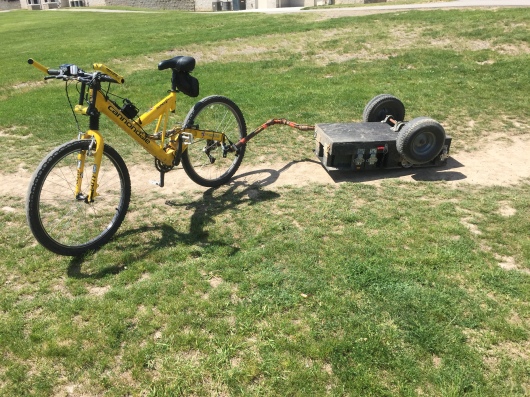
Enter the RideStomp, my take on the powered bike trailer.
The powered bike trailer concept is remarkably simple to implement, I ended up using this project to “break in” our new campus makerspace after it changed rooms and lost some tools. From a drill press to pipe wrenches the trailer project highlighted many of the tools that the space was lacking in its first month.
In any powered trailer build there are a number of big design challenges that must be overcome. These include, The Hitch, The Arm, The Power Train, The Electronics, The Battery, and The Trailer Structure Itself. Below I’ve laid out my design solutions for each.
The Hitch
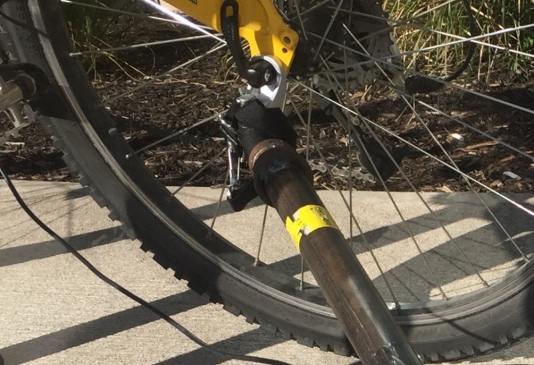
As mentioned before my bike frame is a tad weird so I ended up having to use a hitch that mounts to the axle. This is not necessarily a bad thing but it does put slightly more stress onto a relatively weak part of the bike’s frame.
I purchased a Burly aluminum forged hitch as it looked to be the best product on the market for my application. I would later learn that it is not quite as strong as the company claimed and they have since replaced it with a much stronger looking steel version.


The Arm
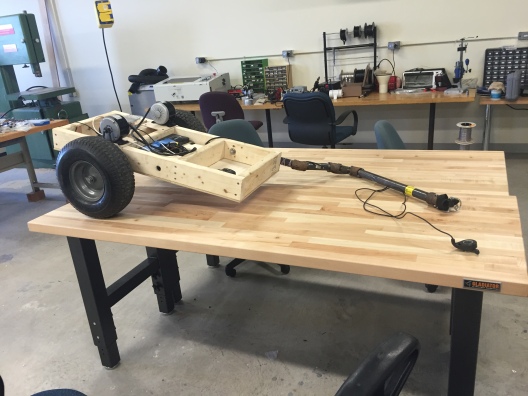
Pre-manufactured bike trailer arms are difficult to come by, even on the internet there was only one source for the bent piece of steel tube necessary to connect the trailer to a bike. To make matters worse it was more expensive than just buying a trailer and taking the arm off. Faced with this problem I instead opted to make my own out of steel plumbing pipe. It’s heavy, ugly, and dirty when you touch it, but it works rather well and is cheap.

The required pipe lengths were found by taking some painter’s tape and mocking up the arm’s angles on the ground behind the bike.
Once twisted together tightly the arm’s joints were made permanent with small weld beads. This step could likely be eliminated if the threads were instead locked with epoxy or similar but this was the best solution available.
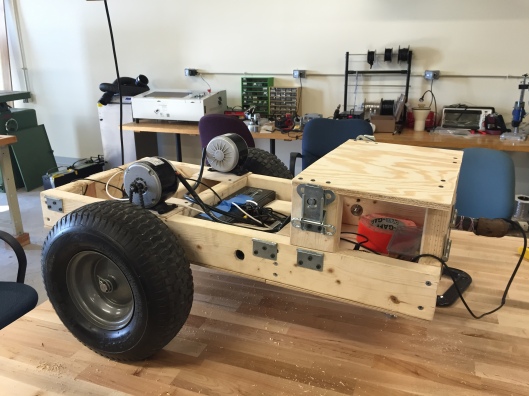
The Power Train
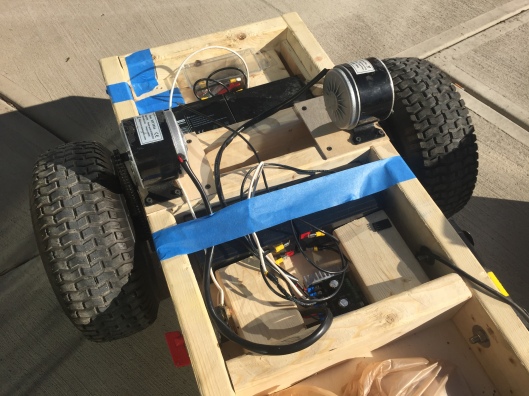
I started with a set of 24 volt scooter motors off of eBay. They worked well for initial testing with sealed lead acid batteries (the type found in power wheels toys). However, they quickly overheated when I switched to higher voltage lipo batteries [they started smoking and smelled quite foul]. I soon replaced them with larger 36 volt motors also from eBay.
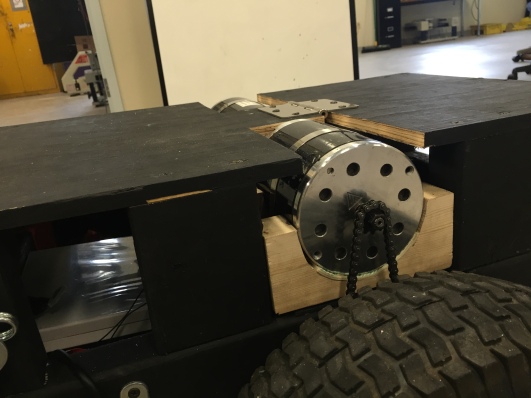
The original and replacement motors both came with pre-attached sprockets for #25 chain so that is what I used for the trailer.
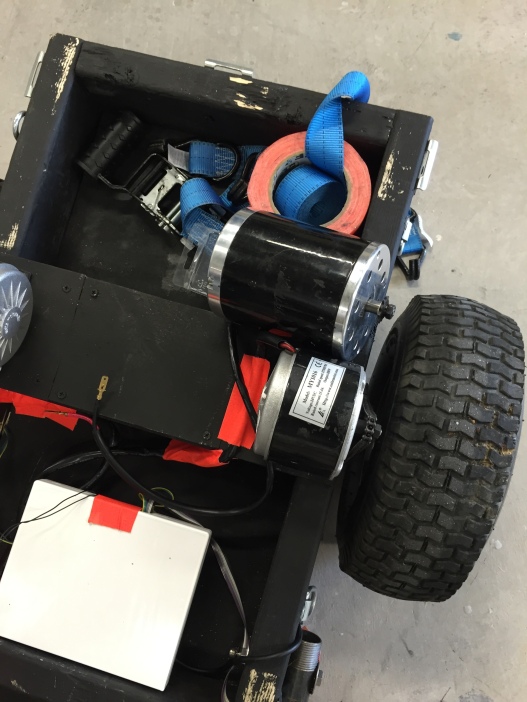
The axle, pillow blocks, wheels, and lower sprockets were bought online at Surplus Center. The keyed wheels have since gone out of production but there are other alternatives that might work better.
Interestingly with the same gearing the new motors are not able to push the bike as quickly as the old motors but they do provide significantly more starting torque which is quite nice. I could adjust the gear ratio to favor speed but I like how it is set up now and my 17 mph top speed is not bad.
The new motors do not have the nice mounting bracket that the old motors had. I devised a motor mounting strategy which uses cut pieces of 2×4 and layers of tape to adjust chain tension. The motors are held down with large hose clamps. This works but is not a great solution as chain tension adjustment requires removing the motors and adding or taking away layers of tape. The 2×4 sections have also not aged well and have begun to fall apart [4 years later].
The Electronics
The electronics were remarkably simple. Despite motor and battery changes I used the same speed controller and have had virtually no issues in the four years that I have abused the trailer.
On the recommendation from some of my friends at the school I purchased a SaberTooth 2×32 DC motor speed controller. It is much quieter than the controller I was testing with as it switches outside of the audible range, and it runs much cooler under normal loads.
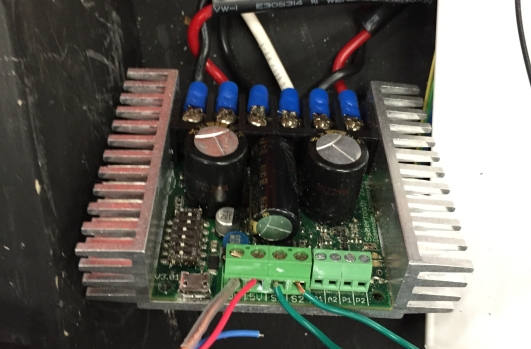
In the final iteration of the electrical design the motor controller is mounted inside of an aluminum enclosure. This maintains some heat dissipation from the device and also shields it from dirt and water ingress.

The SaberTooth is also nice as it has a programmable on board microcontroller that allows me to give it an analog 0-5v signal from my thumb throttle and also lets me set power curves and acceleration ramping.
The system is tied to a thumb throttle designed to mount to bike handlebars. As it did not fit my bike I took to holding the thumb throttle unit in my palm and pushing its lever with my index finger. This is connected to the trailer through an XLR connector. Experience has shown that in the rain and snow water will make its way into the XLR connector housing causing unintended acceleration. I plan to eventually replace it with a waterproof solution.
All of the electronics are placed after a main battery disconnect switch. This lets me leave a battery in the trailer when I’m not using it and also serves as theft deterrence as the disconnect switch is keyed.
Early in the trailer’s life it had skirt lighting courtesy of a strip of individually addressable led lights. These soon started falling off and I didn’t bother reattaching them.

The Batteries
Once I realized the significant limitations that gel cells posed on the trailer’s performance I decided to switch to lithium ion battery power. This switch was expedited by an acquaintance who happened to be selling a dozen brand new hobby style lipo batteries. These 4 cell batteries would normally be used in radio control aircraft [and I did end up using a bunch of them for my RC projects] but when put together they make a very usable ebike battery pack.
I started with 1 pack wired with 6 batteries for 34 volts and 15 amp hours of charge [2S3P]. I eventually built a second pack with the rest of the original 12 batteries. Both packs now have identical connectors with removable balance leads and XT90 main power connectors.

The lipo packs fit perfectly into the ammo cans that the batteries are built out of. I designed these so that if a lipo fire were to occur it would be contained in the can but there is a vent for gas and smoke to escape from. The battery packs are fused internally with large automotive fuses.
For charging, an off the shelf hobby lipo charger is used.

Trailer Structure
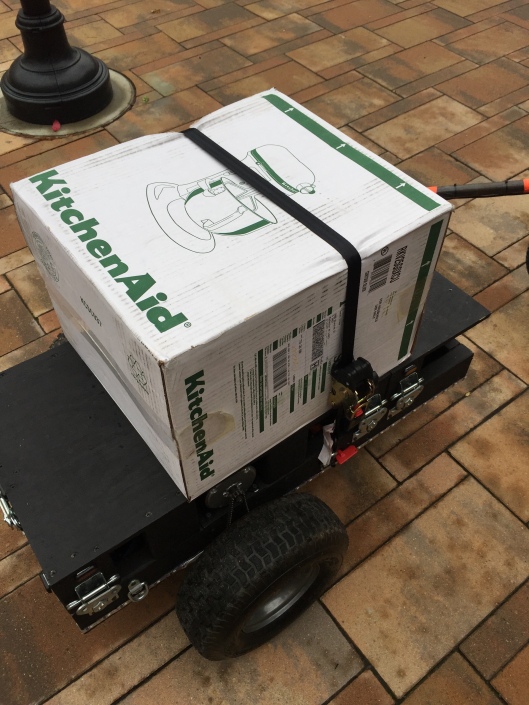
If it isn’t obvious from the photos this trailer was constructed out of materials that I found at the local hardware store. The frame is all 2x4s with thin plywood underlayment. The top cover on the trailer is thicker plywood with 2×4 supports. Everything is held together with deck screws and off the shelf hinges and butterfly latches.


Trailer Life
Just as I had suspected the trailer has cut my commute time around campus significantly. It may not be the prettiest thing in the world but it works wonderfully. It has its quirks but it does exactly what I expected it to do.
Some minor issues:
Occasionally if the XLR connector for the throttle gets water in it the trailer will accelerate to full power and not stop. This is scary when it happens but the bike brakes are strong enough to keep the trailer at bay while I pull the battery cutoff key.
When riding the trailer very hard off road or with a passenger on the trailer the speed controller can overheat resulting in a temporary lack of trailer power.
The way the system is set up the trailer acts as a regenerative brake for the bike when I release the thumb throttle. This is nice as I rarely need to use the bike’s brakes but becomes a major issue if the trailer runs out of battery away from home. It will actively fight you as you attempt to pull it forward with the bike the fix is to remove the trailer’s chains and drag it home that way.
There are no chain guards on the trailer and as such passengers and cargo must be carefully positioned to ensure that fingers and backpack straps are kept well clear of the gear area. I have lost a perfectly good backpack strap to this but have not had any other issues.
Parking my bike with the trailer on it requires a large space and can be annoying both to me and others parked in the same area. This isn’t too much of an issue on RIT’s campus but might be a problem in a city or other environment.
The trailer does not have as good a range as a true ebike on the same size battery. It is reasonably inefficient and can go from 7-14 miles on a battery charge. Having two batteries alleviates range anxiety as the second battery should always have enough power to get you home over flat ground.
If a corner is taken at high speed and a bump is encountered by one of the trailer’s wheels, the trailer will flip. This has happened a few times. Only once has this damaged anything. That time the trailer’s bar bent the rear wheel and it needed to be replaced.

But I still love it.
The trailer is infinity useful not just as a means of expedited transportation.
It also lets me bring along a friend [normally at lower speeds].
It lets me cart around any number of different things about campus.


Had I been asked while designing the trailer originally if I thought I’d still be using it 4 years later I would have said that I doubt that it would last a couple of months. It’s older now and creaks a bit when I bring it up to speed but I know that when this one breaks I’m going to have to make another. A better trailer, with all of the same features but with new ideas taken from my time with the rugged original.
